Private Internet Access VPN on pfSense (Last Updated 08/2020)

This guide has been updated to reflect changes made on PIA's end that stops the old guide from working
NOTE! As of 12/7/2021 I have moved away from PIA and Switched to Mullvad. So this guide will no longer be updated. I highly suggest you read that guide

If you have followed my old guide and now have a non-working setup, just follow the guide to get the new cert which you can add in to your config, and change the port number to 1198 along with the new server if you chose one, then restart the OpenVPN Client service
Here is how I have Private Internet Access (PIA) setup on both of my pfSense firewalls. This setup has worked perfectly for me and does not interfere with any other gateways.
This guide will walk you through setting up the connection to PIA, creating an interface for PIA so you can route traffic selectively over the PIA VPN, Installing and configuring the service watchdog, and going over some firewall rules. I will try to go into as much detail as possible
Server Choice
First, choose what server you want to connect to. I have found that the Dallas and Florida servers work best for me, but that might not be the best choice for you.
You can see all available in the OpenVPN Config generator here:
https://www.privateinternetaccess.com/pages/ovpn-config-generator
Since the Dallas server is geographically close to me, I will be using that one. The address is: us-texas.privacy.network
You can choose between current and nextgen, I chose the nextgen servers. The nextgen servers are newer, so I figured I'd choose that
Certificates
To import the certificate needed, choose the 1198 port option, and click generate

Now edit the file downloaded, and copy the certificate portion to your clipboard (I prefer using Notepad++)

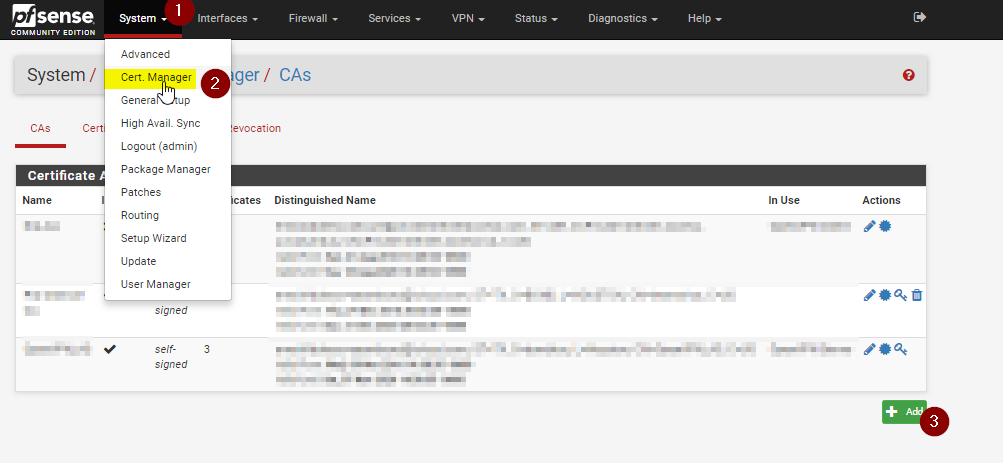
Now log into your pfSense WebUI and navigate to System > Cert Manager and click on the "+ ADD" Button
Now change the method to "Import an existing certificate authority" and paste the copied text into the box. It should look like below
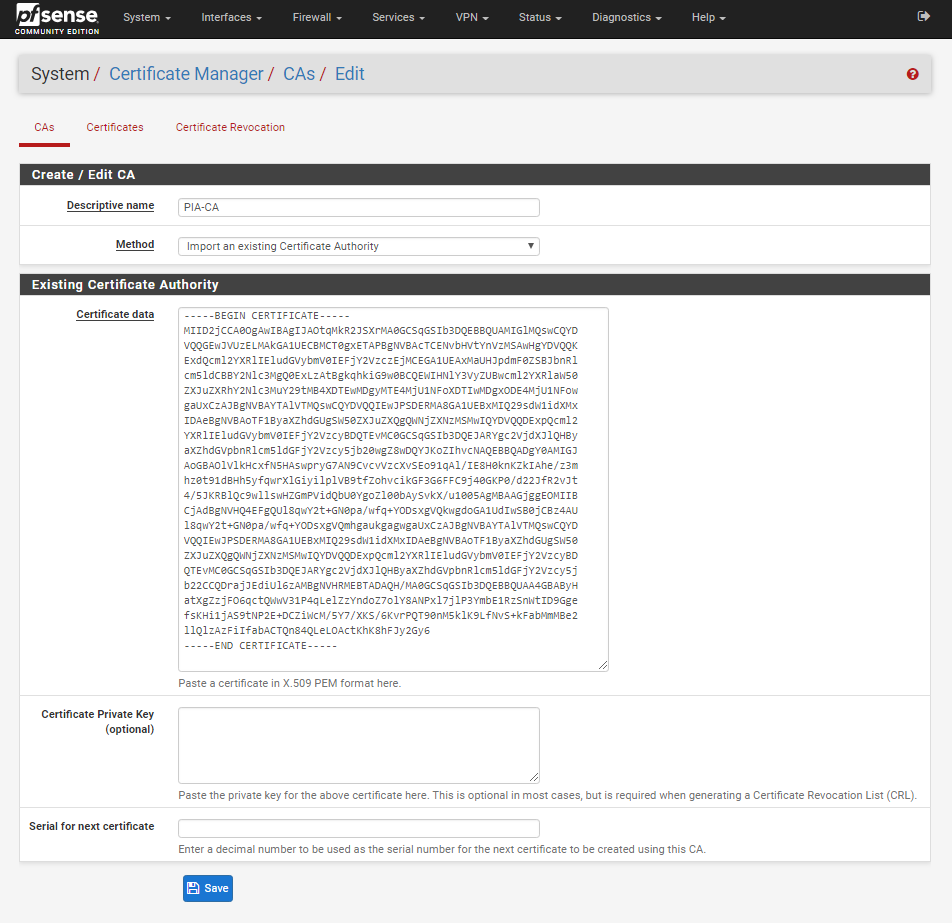
Click Save.
You should now see the certificate listed
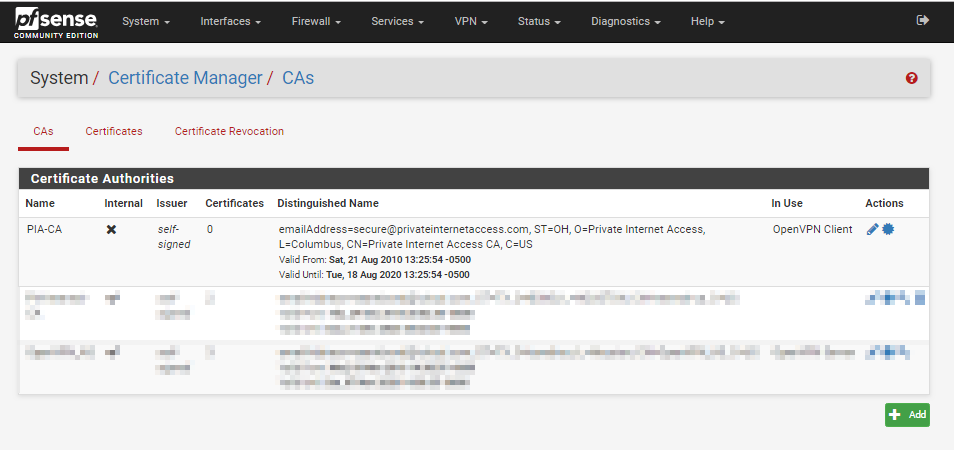
Now we have the certificate listed, navigate to VPN > OpenVPN, then click Clients and finally click ADD

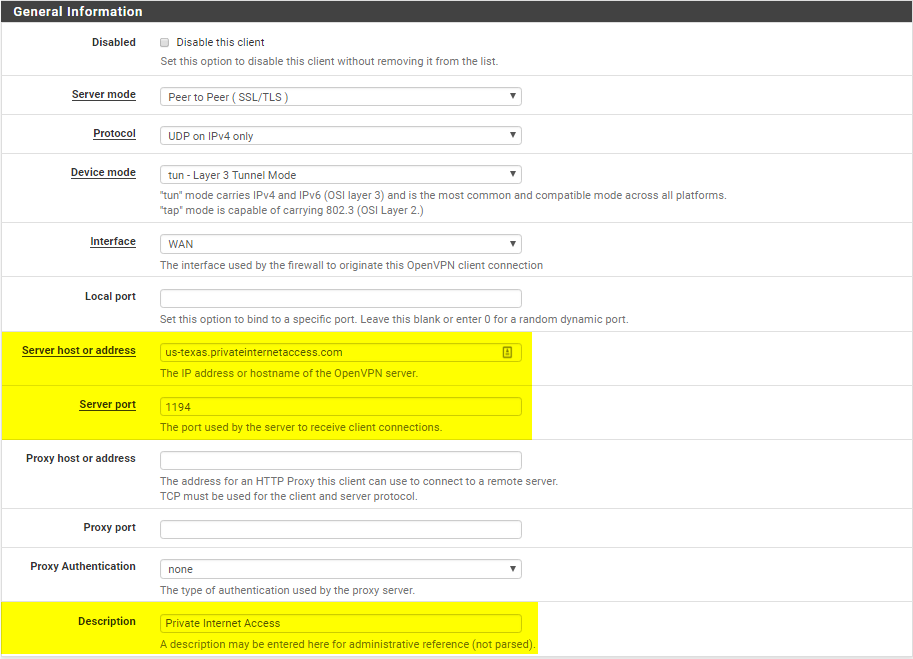
Now we will go through the configuration. I will go section by section, but it's just one long page. I will highlight changes you need to make in yellow, but also verify the rest of the config looks the same, we can't be sure the default configuration won't change in the future
General Information
Now you will want to fill in the server address you found before, I will be using us-texas.privateinternetaccess.com
Then the port which will be 1198
Then, give it a description. See my screenshot for reference. I have highlighted everything you need to change, but make sure the rest is the same too
NOTE! This screenshot was from an older guide, so you may see that I have 1194 listed. This should be 1198
User Authentication Settings
This one is pretty self explanatory, enter your PIA username and password, and don't check the box to not retry on fail

Note (1/2/19): It has been suggested that PIA sometimes has an issue with authentication retry, and that you would be better served CHECKING the box so that pfSense doesn't try and re-auth. Personally I have never had any issues with authentication, but keep this in mind
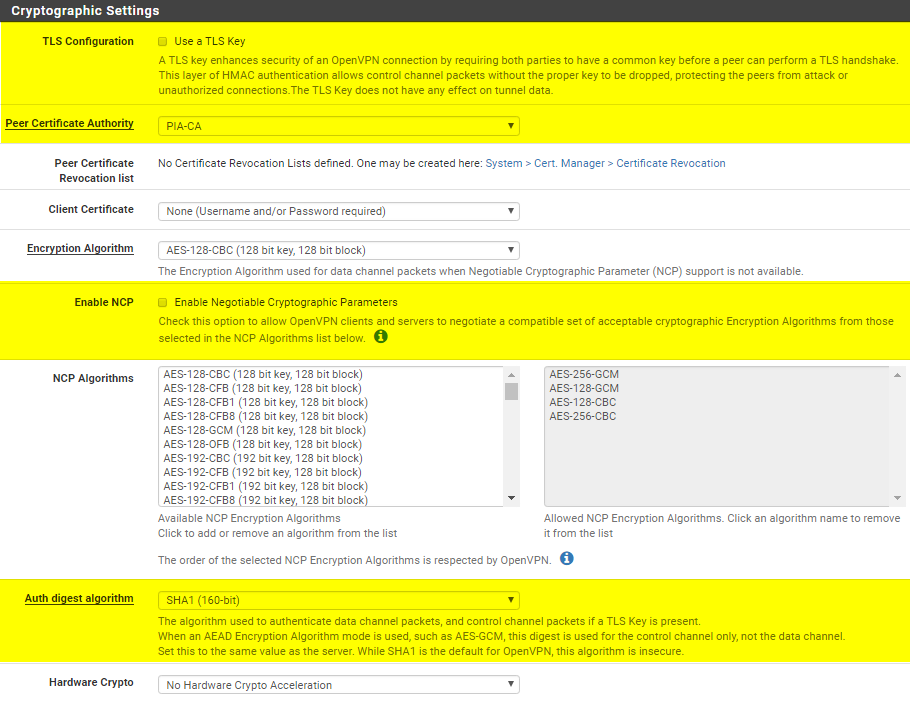
Cryptographic Settings
For this section, uncheck the TLS key box, Select your PIA-CA you created earlier and uncheck NCP
I have had nothing but issues with NCP, if you want to play around with it later you can always come back and enable it, but for this guide we are turning it off. Most of these options can be tweaked, so once you get it working come back and decide what you want to use. PIA has a list of supported algorithms
Select SHA1 as the auth digest algorithm
Tunnel Settings
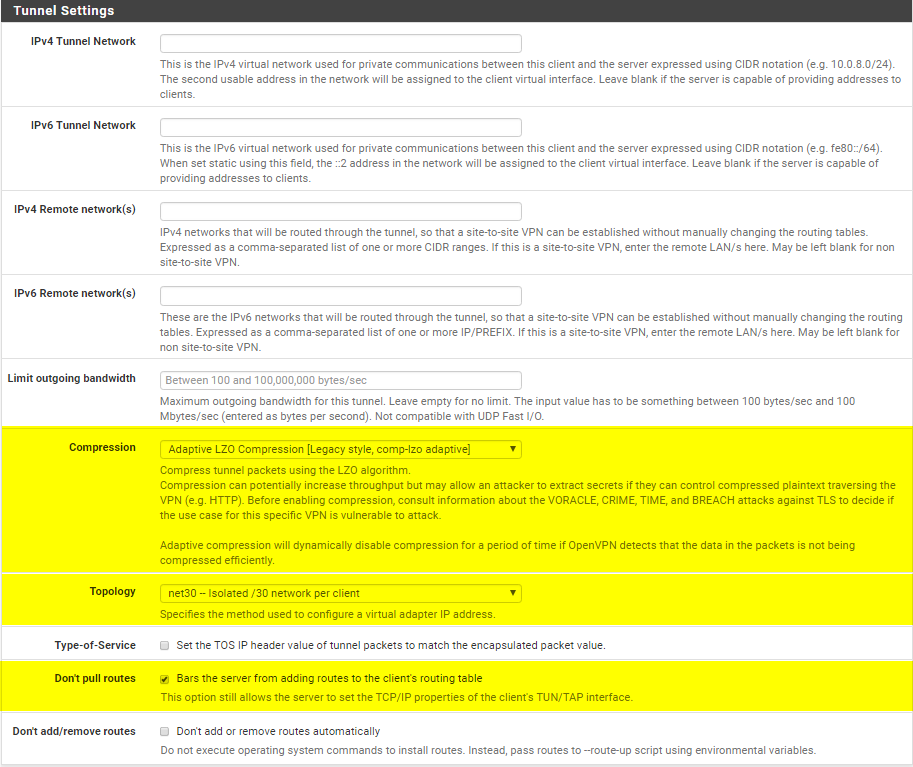
Change Compression to Adaptive LZO, change topology to net30 and check the "Don't pull routes" box
If you don't check this box, all traffic will go over the VPN by default, which is probably not what you want. If that IS what you want, then leave it unchecked.
Advanced Configuration
In the custom options box, enter
remote-cert-tls server
and set the gateway creation to IPv4 only (Since PIA doesn't support IPv6 at the time of writing)

Finally, click save.
Interface Assignment
Now go to Interfaces > Assignments

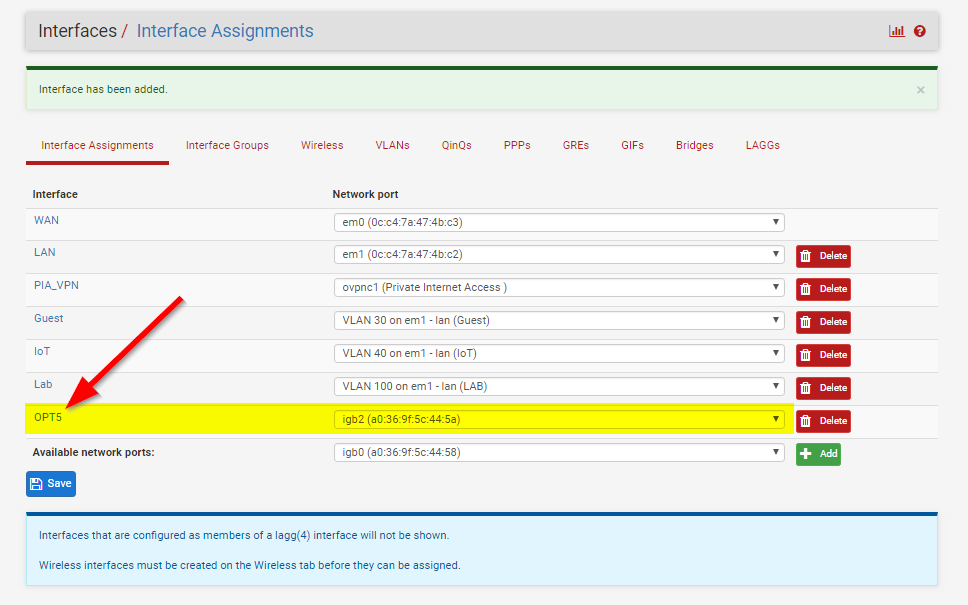
On the dropdown for "Available Network Ports" you should see your PIA VPN listed. Mine is called ovpnc1 (Private Internet Access). Mine isn't listed because I already have it bound to an interface
Select yours, and click add

Now that the interface has been added, click on the interface name, here I am clicking on OPT5, but yours will be different. It should be at the bottom of the list
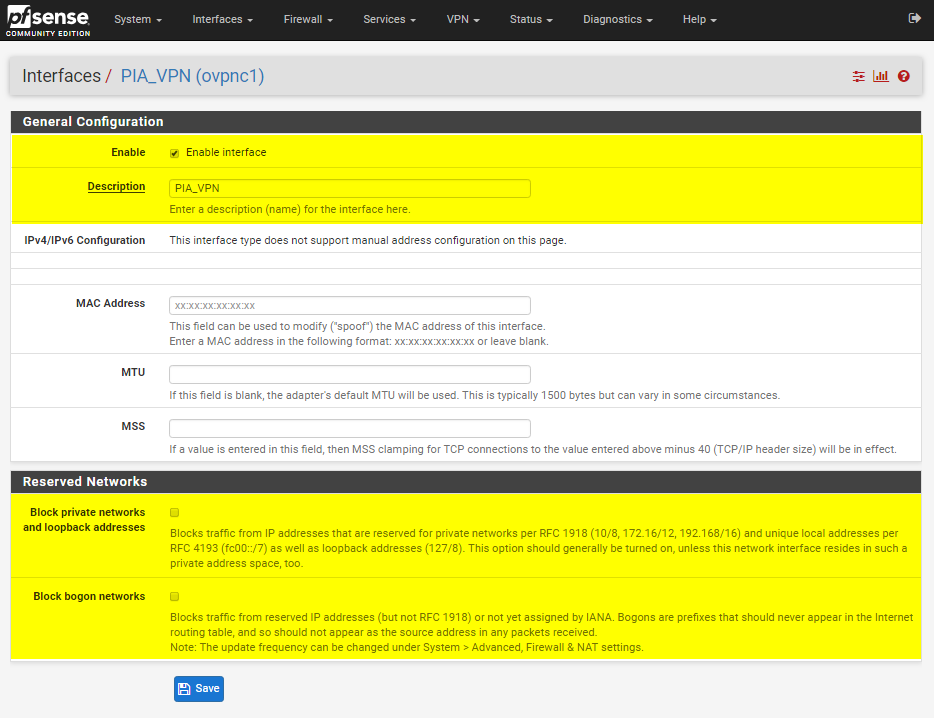
Now you can check the box to enable the interface, and give it a better name, I called mine PIA_VPN.
Also make sure the reserved network checkboxes are unchecked.
Click save
Outbound NAT
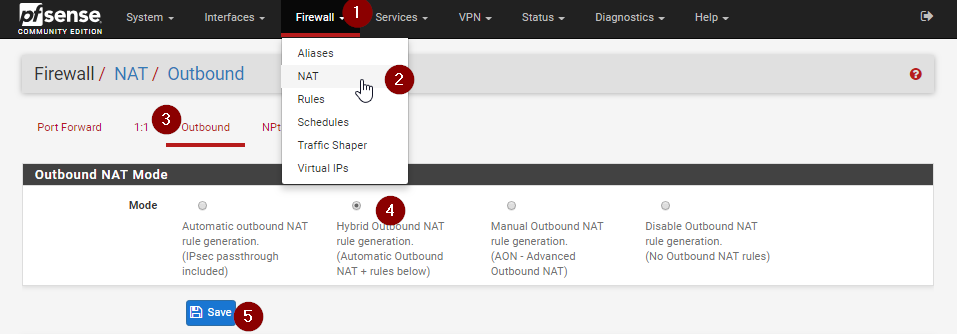
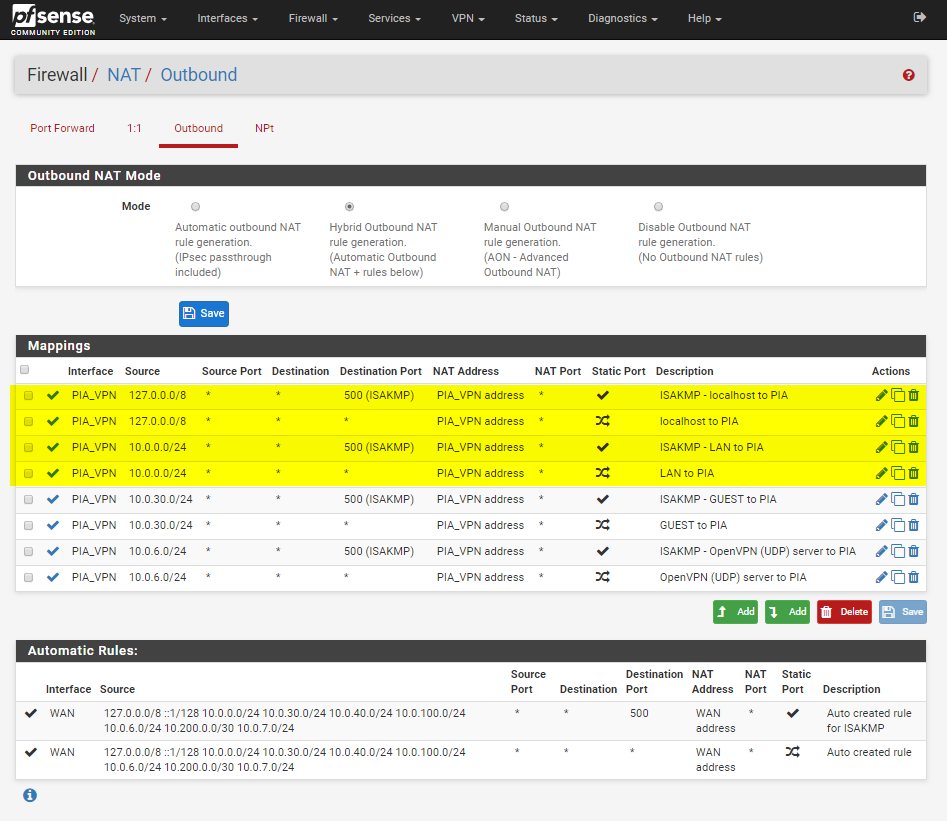
Now navigate to Firewall > NAT and click out Outbound
Click the radio button to change the outbound NAT mode to Hybrid, and click Save
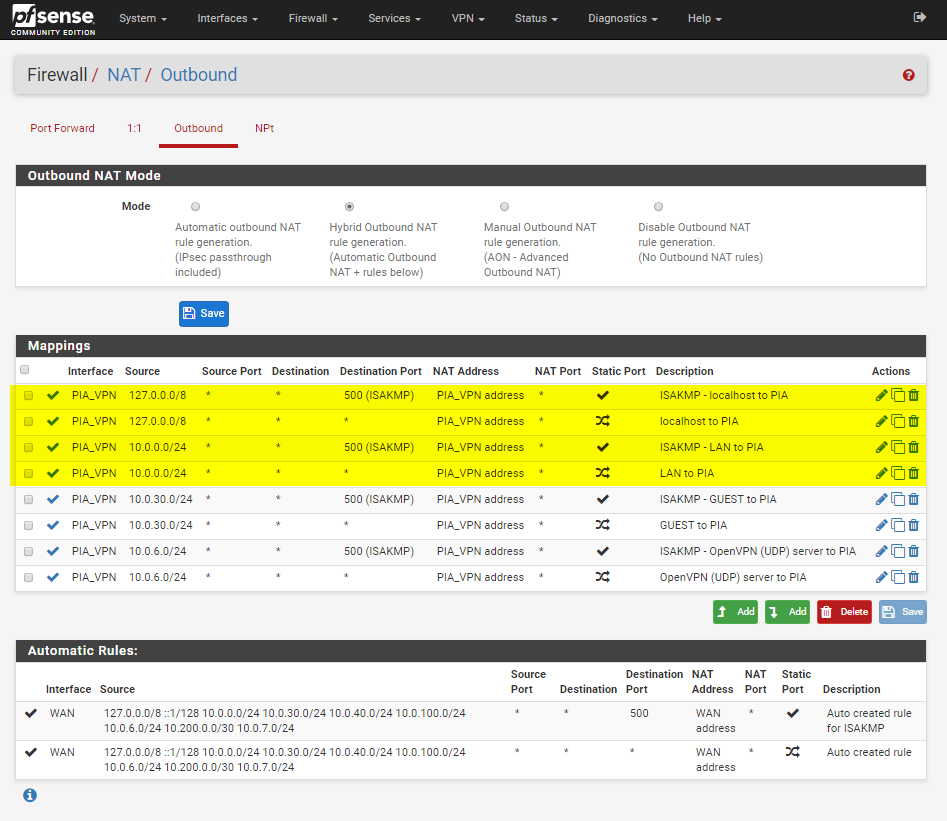
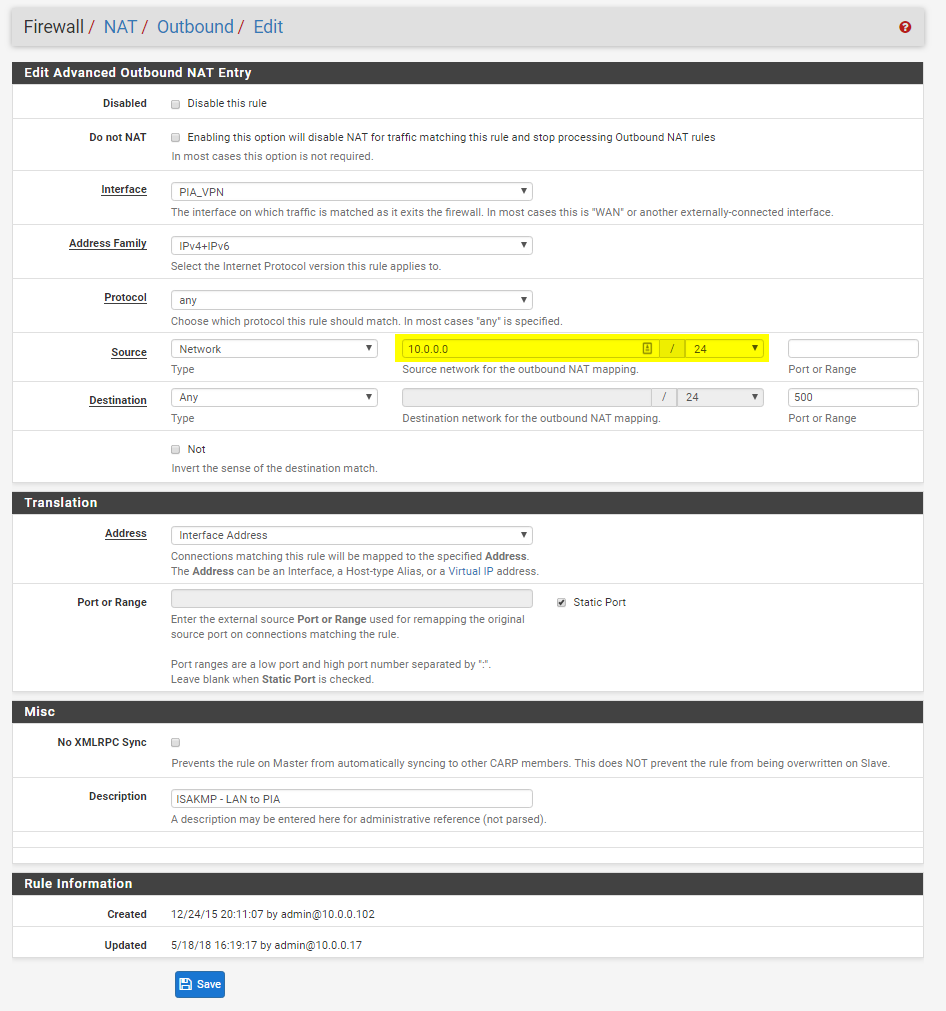
Now we need to create some outbound NAT rules. You only need to create the NAT rules for networks you want to reach the VPN. So you will need localhost, and then probably just your LAN network. I have added some other networks so they can access the VPN too.
I have highlighted the ones you need to make. Just make your screen look like mine!
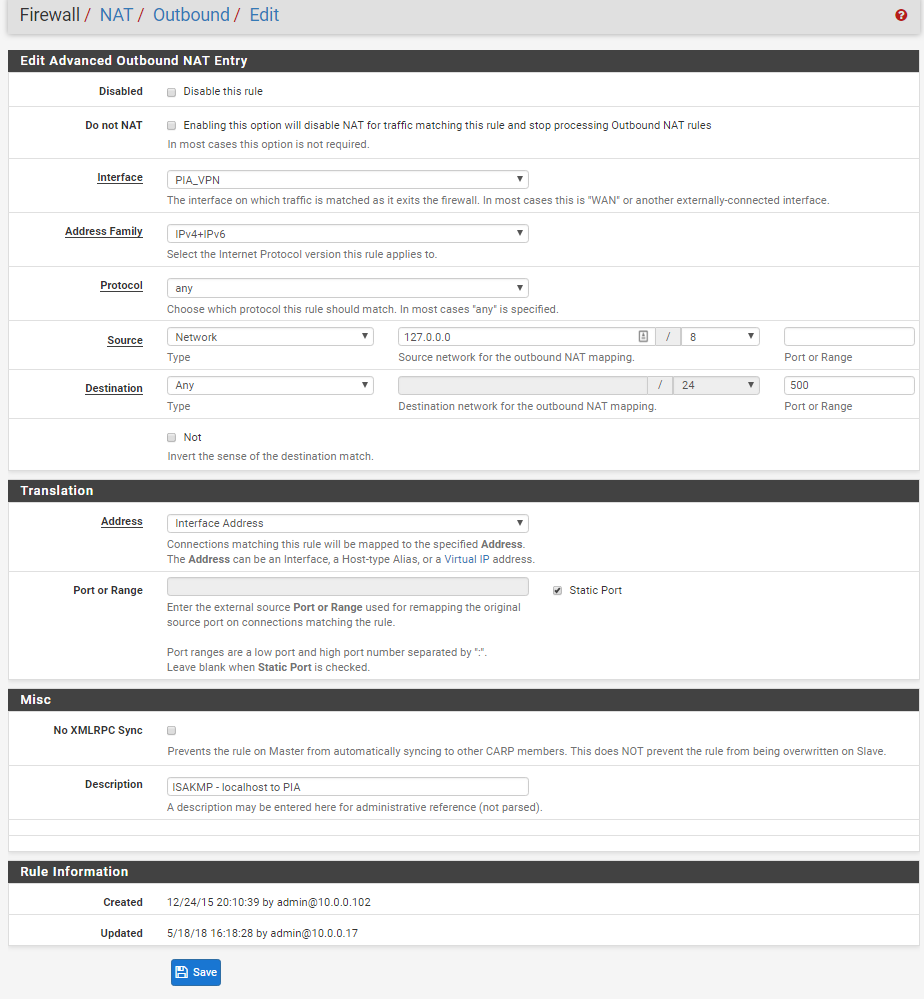
First, the localhost to PIA rules. You can copy mine 100% for these as long as your interface is correct
The first Localhost to PIA rule

The ISAKMP Localhost to PIA rule
Moving on to the LAN rules. You need to change my 10.0.0.0/24 entry to whatever your network is!
The first LAN to PIA rule
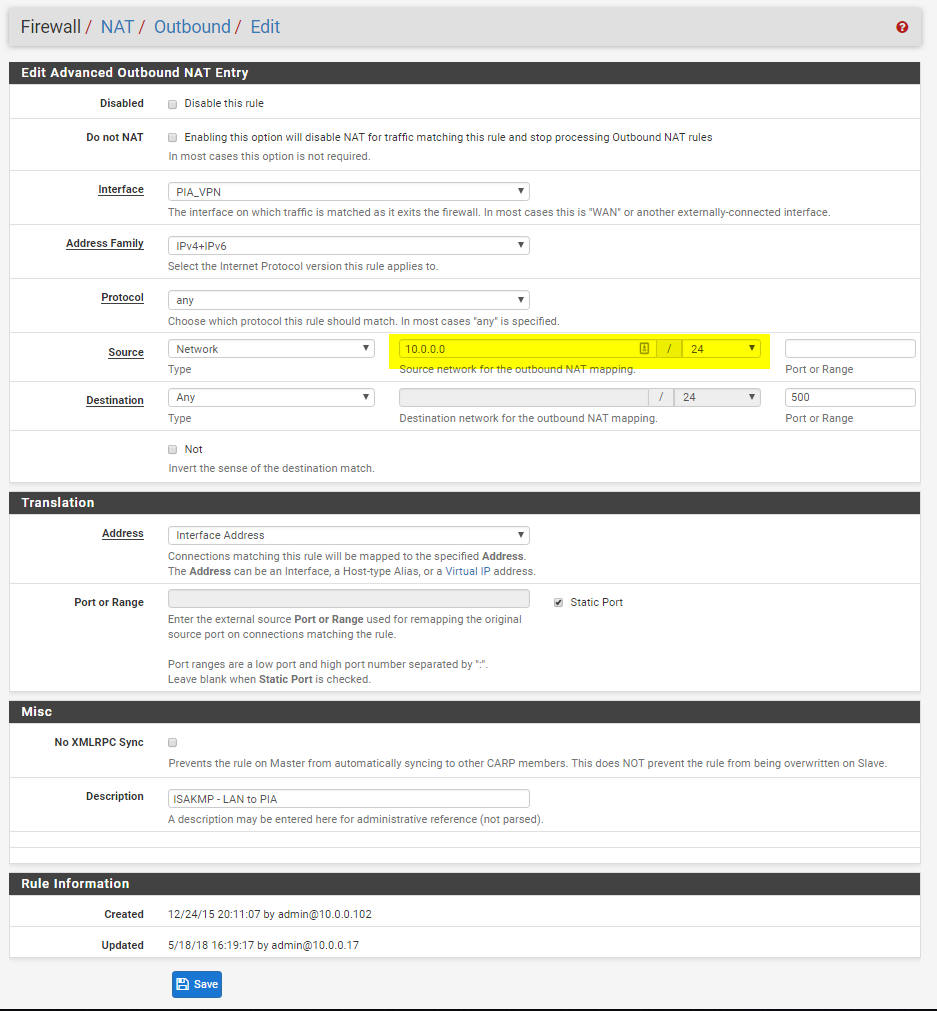
The ISAKMP LAN to PIA rule
Done? Make sure it looks like mine does. If it looks off, go back and verify. If you need to re-order the rules, just drag them and click save in the bottom right
Gateway Monitoring
By default the PIA gateway will show as down, as it can't monitor the upstream gateway. Here we can fix that as well as change a setting which could cause traffic to leak out over the regular WAN
Go to System > Routing and click on Gateways
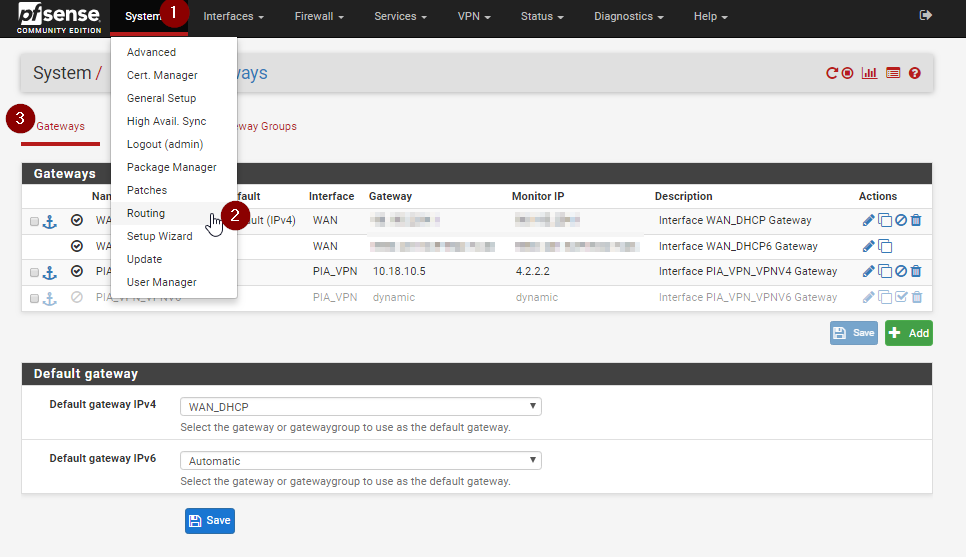
Now click the pencil button to edit the gateway for PIA

Now enter a monitor IP for the interface to monitor. I chose to enter 4.2.2.2
This will not give you a very accurate latency reading for your interface, but it will verify the connection is working, and if there is a connection issue like high packet loss
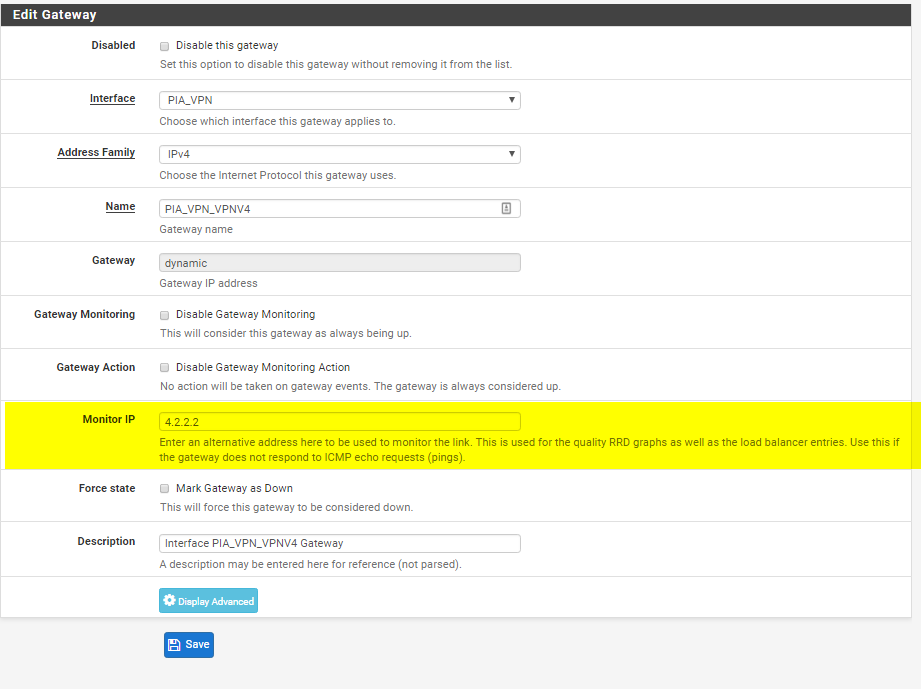
Click save
Now your gateway should show as connected and online

Next, go to System >Advanced > Miscellaneous and scroll down to Gateway Monitoring. Check the box to not create rules when gateway is down

Service Watchdog
Now we will install and configure the service watchdog package. This will restart the OpenVPN service and reconnect PIA if it disconnects/crashes for some reason
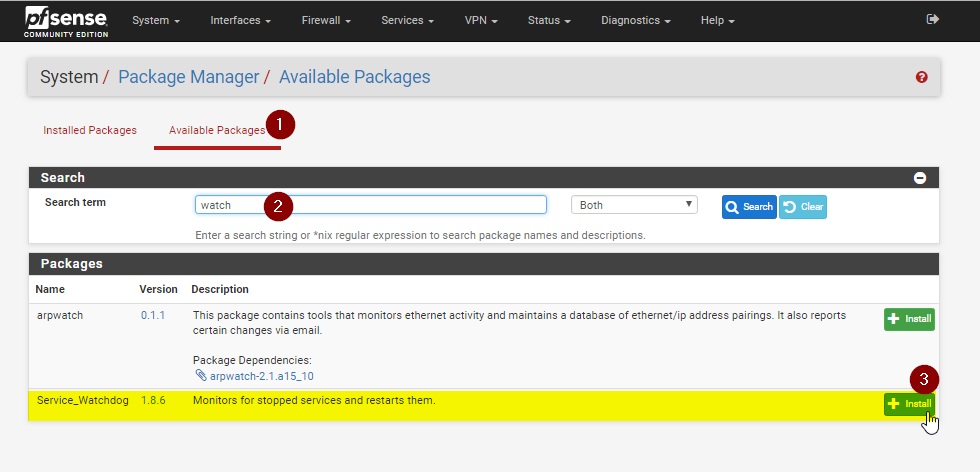
Click on System > Package Manager

And then click on available packages, search for "watch" to find Service_Watchdog. Finally Click Install and then confirm the install
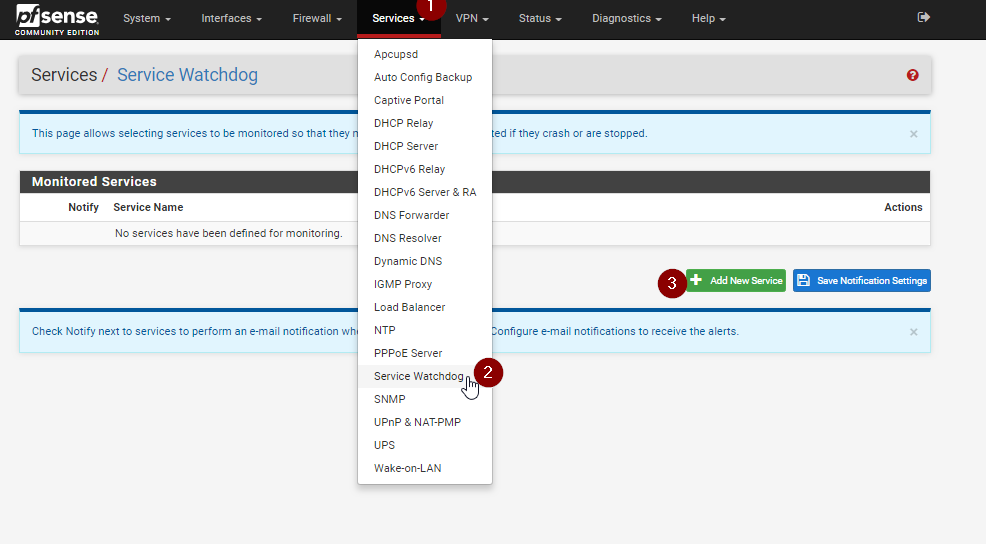
Now go to Services > Service Watchdog and click on Add new service
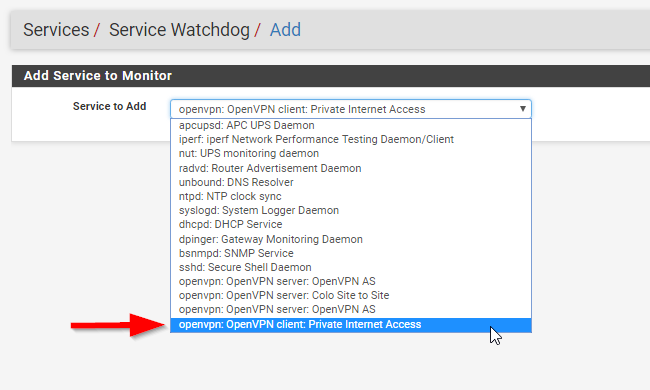
From here, select your PIA service
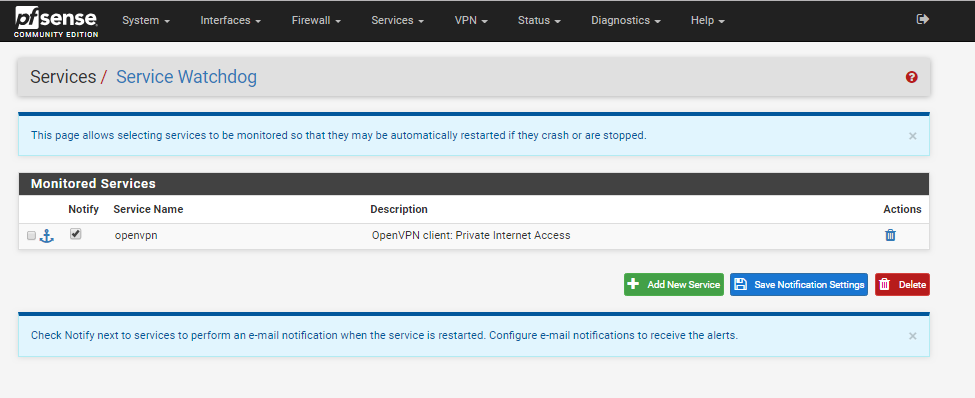
And click add

Now its configured, and will restart the service if needed
Firewall Rules
First we will create an alias to use in the firewall rule. This will let you add and remove IP's at will without having to modify the rule and add more rules for more devices.
First, lets go to Firewall > Aliases and click on IP and then click add
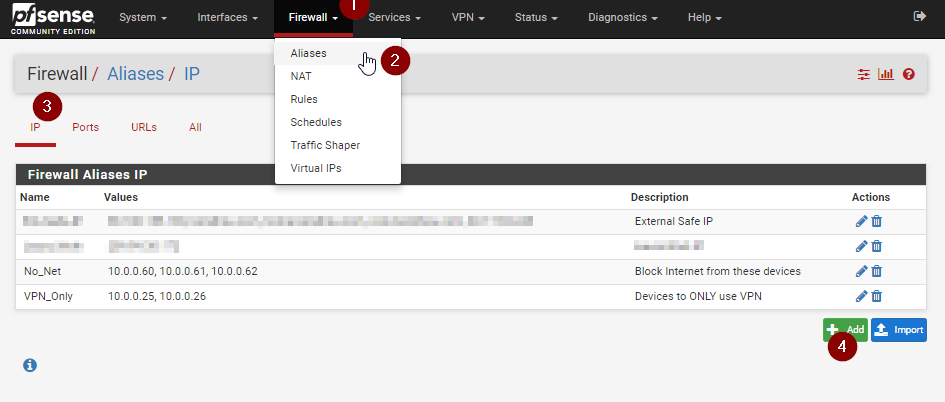
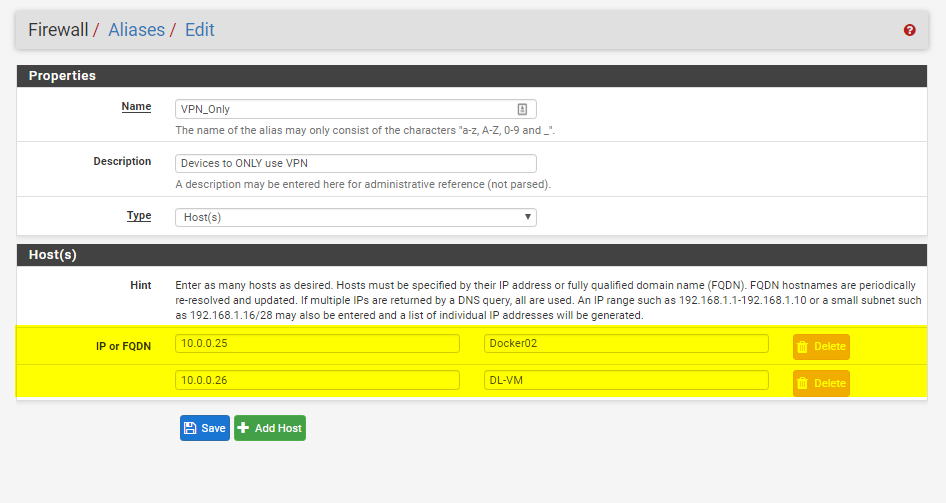
Now go ahead and add the IP's for the devices you want to use the VPN only, and give them a description if you want. Click save.
Now head over to Firewall > Rules and click on LAN

Here you can see the two rules which control where the traffic goes
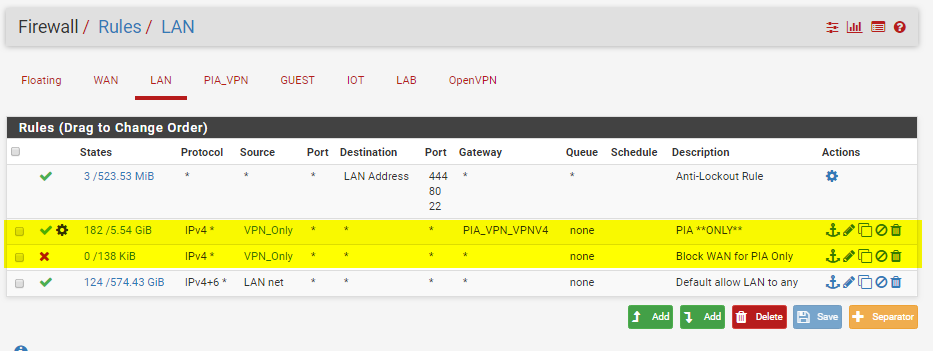
These rules need to be ABOVE the default Lan to Any rule, and the deny rule needs to be BELOW the rule which specifies the gateway.
The reason we have the deny rule is so that if the VPN disconnects, traffic doesn't start going over the default gateway.
Let's get into the first rule which pushes traffic across the VPN gateway. Make sure to specify the source as the alias we created. Then click on Advanced, and specify the PIA_VPN gateway, click save and apply the rule
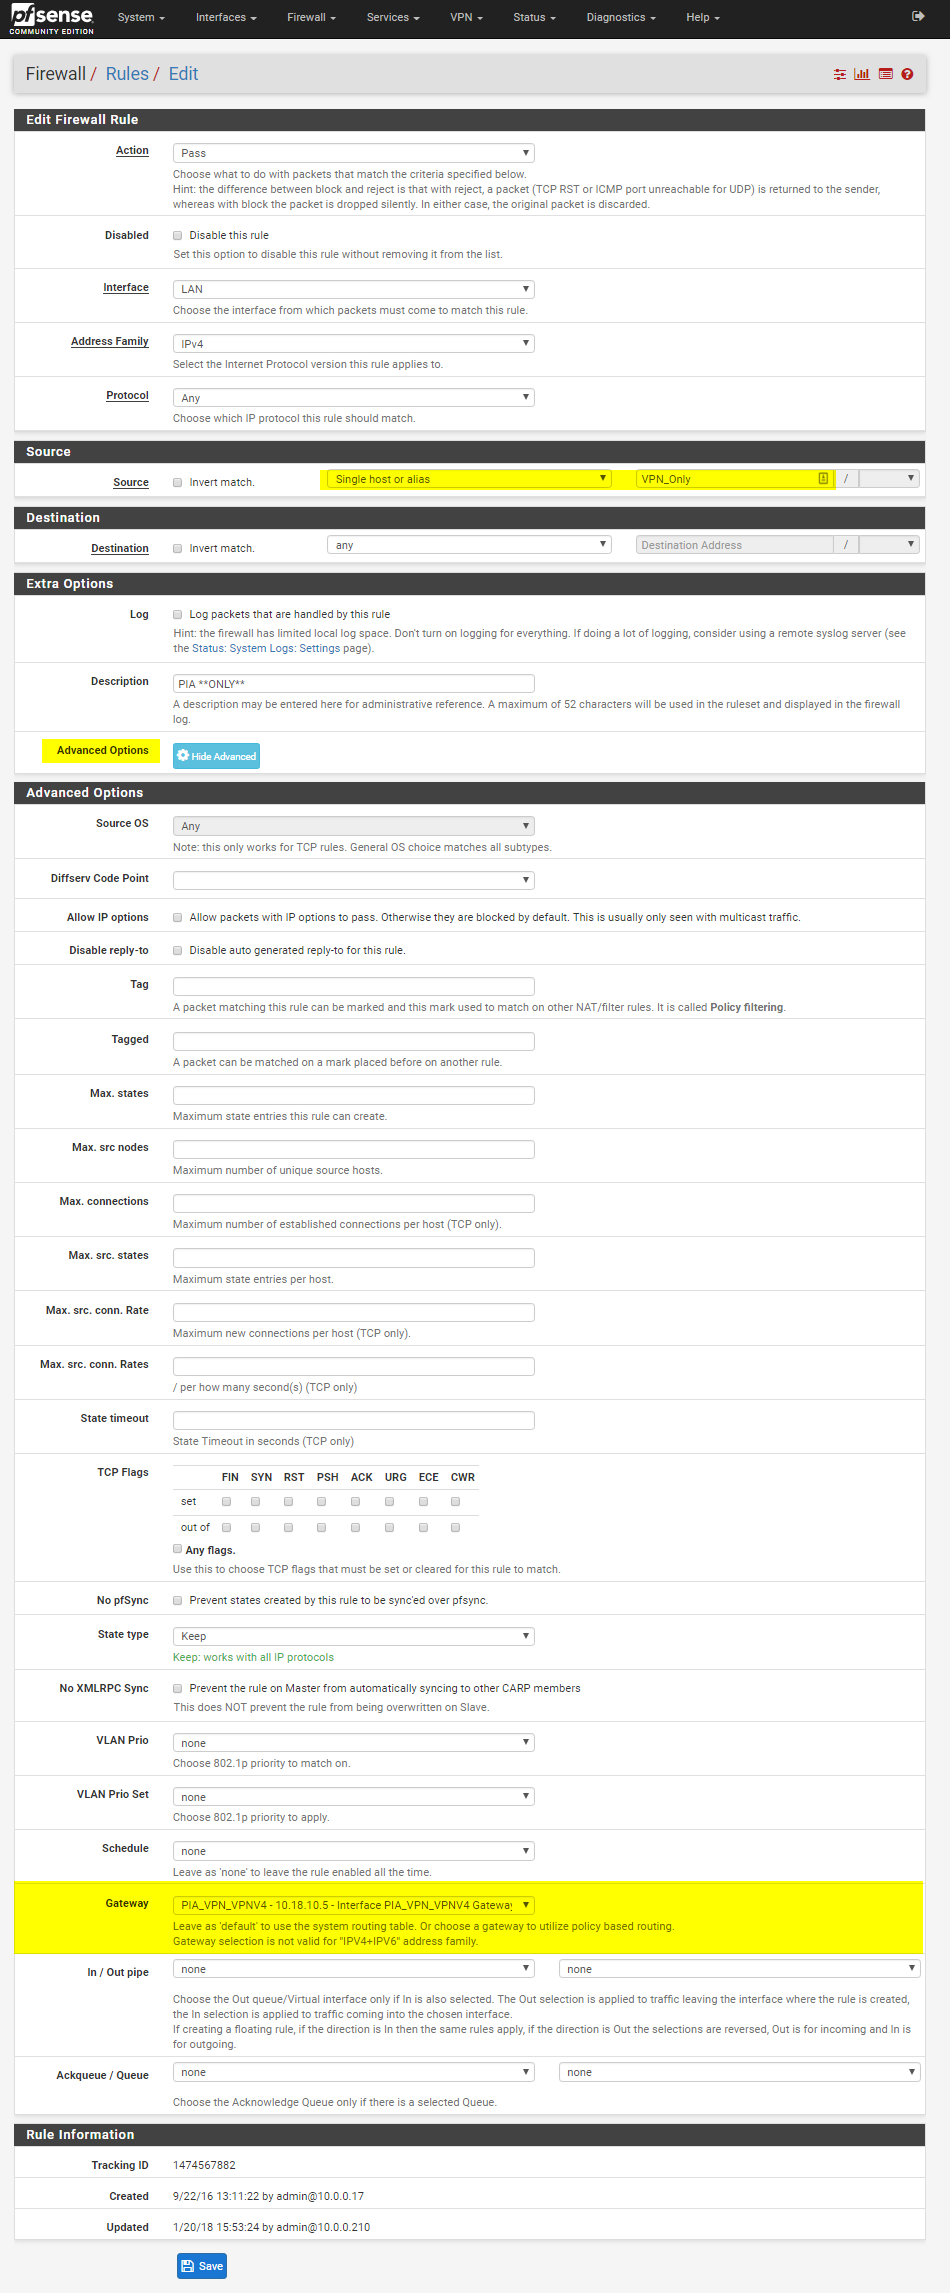
Then, lets create the deny rule. Make sure the action is Block and you specify the alias again. We do not need to specify the gateway here as we are blocking on the default gateway
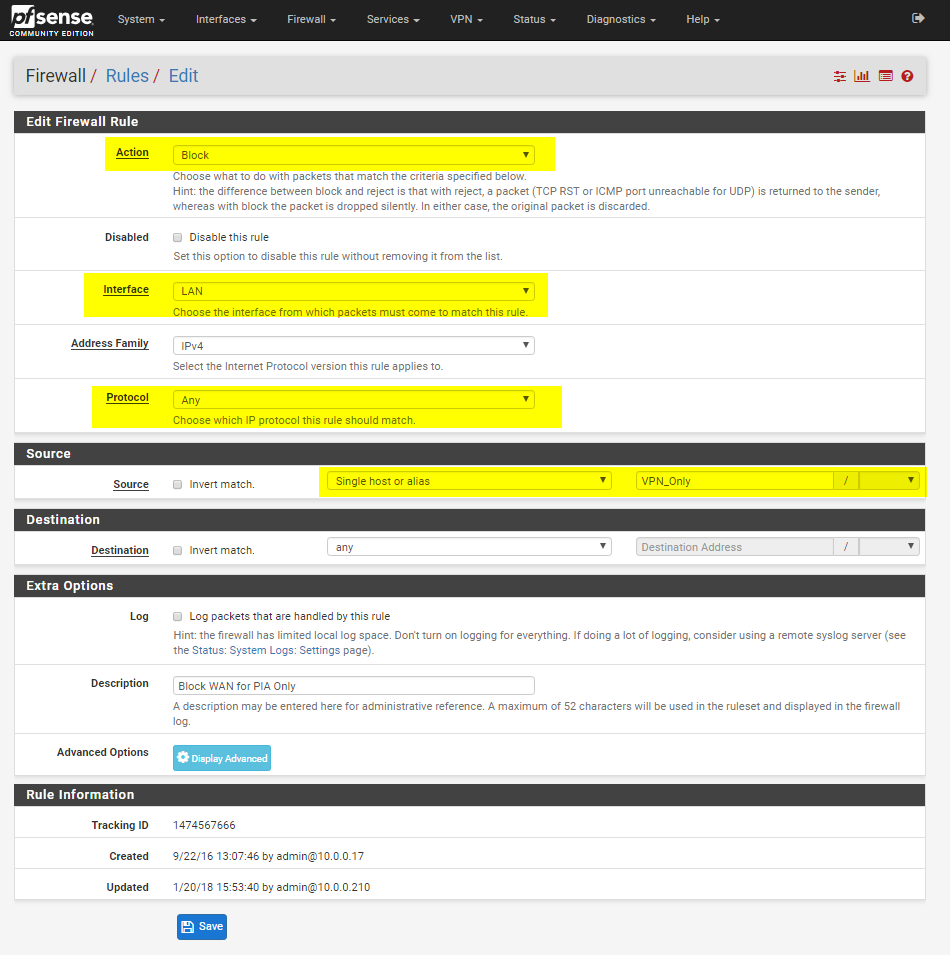
Click save, and apply the rule. Make sure they are in the correct order!
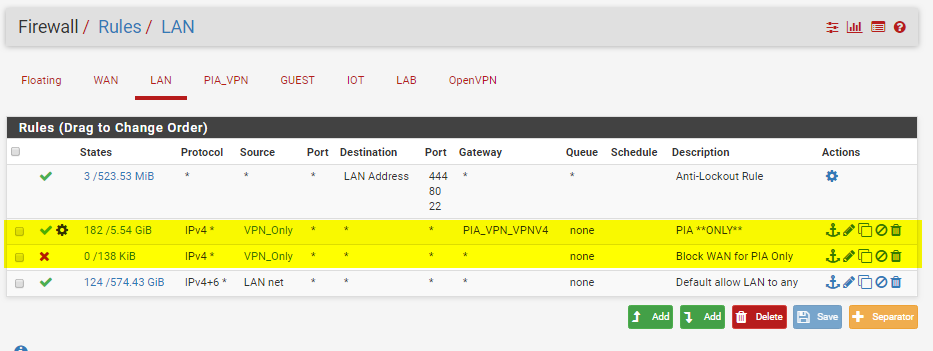
Now we have done that, you should be done. Everything on those IP's in the alias will go over the VPN. If the VPN disconnects, no internet traffic will pass and as long as the IP doesn't change, traffic CAN NOT go over the normal gateway
Important DNS Note
If you are not using DNS over TLS to a trusted, privacy oriented DNS Resolver like CloudFlare's 1.1.1.1, then you will leak your IP over DNS and this could be a problem
To get around this, you should hard code PIA's DNS servers on the system you are putting over the VPN. The DNS servers are 209.222.18.222 and 209.222.18.218
Be sure to check if your DNS requests are leaking your normal public IP: https://www.dnsleaktest.com/
Setting these DNS server will probably affect local DNS resolution, so you should really just use DNS over TLS...
https://www.netgate.com/blog/dns-over-tls-with-pfsense.html
You could create some NAT rules to intercept DNS requests and force them elsewhere, but it's more work than just using DNS over TLS, which you REALLY should be doing anyway...
Thats it!
